Step 1: Prepare site by removing all pumping equipment and any debris.
Step 2: Remove the top of the casing and cut off 3 feet below the surface.
Step 3: Disinfect water by adding chlorine, see Table 1 of the K-State Extension publication for the amount needed: MF935 Plugging Abandoned Wells--Water Quality Series
Step 4: Fill the water zone with porous material, meaning sand or gravel less than 1 inch in size. Refer to the plugging diagrams for examples (Figures 1 & 2).
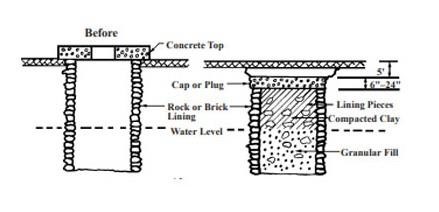
Figure 1. Plugging diagram for a hand-dug well, before and after plugging.
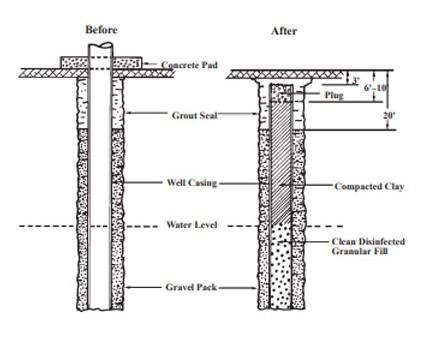
Figure 2. Plugging diagram for a drilled well, before and after plugging.
Step 5: Add compacted clay above the water zone. Stop when you are five feet below the ground level.
Step 6: Add a grout plug. This can be bentonite clay, cement grout, or neat cement. See the K-State Extension publication for grout recipes, and to estimate how much is needed for your specific well size. MF935 Plugging Abandoned Wells--Water Quality Series. The thickness of the grout plug should be about 6 inches for most wells.
Step 7: Fill in the rest of the hole to the surface using compacted subsoil, and then use topsoil for the very surface. This will settle over time, so mounding the soil up about 10” should be about right.
Step 8: Fill out a plugging record form WWC-5P and submit to the Kansas Department of Health and Environment’s Bureau of Water-Geology Section. This form is available at: https://www.kdheks.gov/waterwell/
Source : ksu.edu