Crop Scouting Basics

May 14, 2020

By Rebecca Vittetoe and Meaghan Anderson et.al

With planting wrapping up and crops beginning to emerge, now is the time to start scouting fields regularly throughout the growing season for any potential issues. Scouting fields and monitoring crops throughout the growing season can help you make more informed management decisions and stay on top of potential issues that may come up during the growing season. Even if some issues cannot be fixed, regular scouting can help us better understand what happened in the field and make adjustments to reduce issues in the future. This article will discuss the basics of crop scouting as well as crop scouting tools and resources.

Crop Scouting Basics

Normal vs. Not Normal:  It is important to be able to distinguish between what a normal plant looks like (above and below-ground) and what a not normal plant looks like. Understanding and recognizing crop growth and development stages provides key insight in determine if things are on track or are being influenced by environmental conditions.  

Additionally, other key symptoms that tell us something is not normal with a plant include the plant color; crinkling of leaves; loss of leaf tissue; wilting; and pinched, stunted, or deformed root systems.
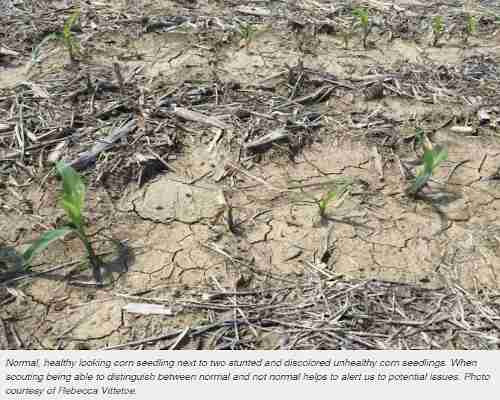
Being able to distinguish between normal and not normal helps alert us to if there is maybe an issue going on in a field. If you don’t know why it’s not normal, that’s totally fine. There are resources and people you can turn to in order to determine what’s going on in the field.

Scouting Procedure:  Start with an overview of the field looking for any unusual patterns or odd areas that may require a closer investigation. When walking through the field, it is also recommended to have a general scouting planning and walk through the field in a pattern whether that be a “Z” or “W” pattern, or a diamond pattern to make sure you get a good observation of what’s happening across the field. Change up the route you take through the field each time.   

As you walk through the field, stop several different points along your route and take a closer look at the plant level. It is suggested you take a closer look at 5 to 15 plants at each stop for a minimum of 50 to 100 plants per field.

Crop Scouting Tools/Resources
The following is a list of useful crop scouting tools:

  • A clipboard or tablet that can be used to take notes while walking through the field.
  • Pen and paper to record information, as well as electronic devices such as cameras, smartphones, or other mobile devices.
  • A hand lens or mobile digital microscope to see small insects or disease lesions normally not as visible to the naked eye.
  • Sample collection bags, vials, or a cooler useful for collecting diseased plants or insect specimens to be professionally identified.
  • A pocket knife or hawkbill knife used to split or cut pods, stalks, or stems while searching for pests.
  • A trowel or spade (recommend a flat bottom spade) to sift through soil surrounding plants to look for insects or to dig up roots.
  • A sweep net to collect insect samples.
  • A soil probe and soil sample bag to collect soil samples for nematode or nutrient tests.
  • Measuring tape to collect stand counts and measure patterns within a field to identify potential causes of abiotic symptoms related to tillage, sprayer, or planter widths.
  • Personal protective gear is sometimes required and always useful. For example, special protective eyewear, long-sleeved shirts, or other gear may have to be used when scouting.
Source : iastate.edu
Subscribe to our Newsletters

Trending Video