Proper care and management of dairy calves are some of the most important components of a successful dairy operation. Several tools are available to assist dairy farmers and personnel in their calf care routines. The esophageal tube is a valuable tool that can be used:
- To ensure the colostrum feeding as soon as the calf is born
- To provide milk on the first days of a calf's life if they are unable to suck from the nipple bottle
- To provide electrolytes when a calf is sick
The proper and timely use of an esophageal tube can significantly affect a calf's health and future performance. Therefore, it is important to know when an esophageal tube should be used, how to use it safely, and what can be delivered using it.
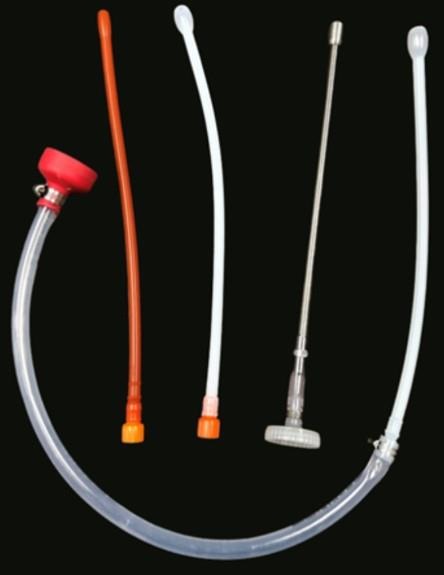
There are several esophageal tubes on the market. They are usually made of non-flexible plastic or stainless steel and are about one-half inch in diameter. In most cases, they are about 16 inches long and have a rounded bulb at the end that goes into the calf's esophagus. The esophageal tubes attach to bags or bottles directly or through a flexible tube that can be bent or comes equipped with a flow control valve or clamp to prevent the content from flowing while the tube is being introduced or removed.

Different esophageal tubes are available on the market for tube-feeding calves.

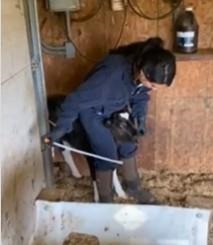
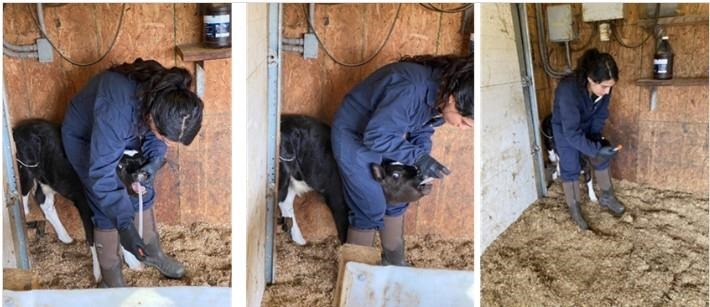
The calf is restrained between the person's legs and backed up into a corner.

Inserting the esophageal tube.

Removing the tube, lowering the calf's head, and pulling it toward the ground.
The rounded bulb at the tip of the tube is important to prevent the throat from being scraped while inserting the tube. It will also help to control backflow of liquids.
Keeping an esophageal tube feeder on the farm will help ensure proper colostrum feeding to calves. Whether it is due to the farm's protocol where all newborns get colostrum through a tube, or necessity in the case of calves with suckling issues, the administration of colostrum through tube guaranties that the calf receives enough colostrum during a time when there is maximum absorption of immunoglobulins.
Calves that are born weak, premature, from a difficult calving process, or with a poor suckling reflex will benefit from using the tube to assure fast and efficient colostrum delivery that will set them up for success.
Another reason to have an esophageal tube at your farm is to replenish fluids and electrolytes to calves with suppressed appetite and/or dehydration due to sickness or injury. Sick calves, such as calves with diarrhea, can quickly be under life-threatening malnutrition and dehydration if not treated correctly in the initial stages of the disease. Although this can be a valuable tool in your farm toolbox, having a straightforward protocol that states when to use electrolytes, how much to give, and many other questions that might arise without a comprehensive protocol is also essential. For more information about identifying dehydrated calves and treating them properly, please review this article from Penn State on electrolytes for dairy calves. Make sure to talk to your veterinarian about creating the best protocol for your farm.
It is important to highlight that feeding milk or milk replacers using the esophageal tube to calves that are older than 2-3 days or older should be avoided due to the risk of developing rumen acidosis, especially when forced-fed repeatedly. Ruminants have an esophageal groove that is stimulated to close when a calf drinks milk, suckling the dam, bottle or out of a bucket. When the groove is closed, a bypass is formed, directing the milk or milk replacer into the abomasum, bypassing the rumen. When tube-fed, the milk or milk replacer is deposited directly in the rumen. Shortly after birth, bacteria can be found in the calves rumen. These bacteria will ferment the milk or milk replacer that is deposited in the rumen. The product of this fermentation is the volatile fatty acids (VFA) that can reduce the rumen pH, causing acidosis that will set the calf back. However, an esophageal tube can be used to feed electrolytes safely to ill calves.
Before inserting an esophageal tube, ensure you have all the necessary equipment and that it is clean, sanitized, in good condition, free of cracks, nicks and rough edges. An extra tip is to have one tube feeding equipment to administer colostrum and another to administer fluids. Calves receiving fluids are, in most cases, sick. Even with a proper cleaning routine, using the same equipment in ill and healthy calves can increase the risk of infection, especially in newborns.
Steps for tube-feeding calves
- Restrain the calf. Position a standing calf between your legs and back the calf into a corner. Make sure you keep the calf head up. If the calf cannot stand but is still strong enough to swallow, position the animal on its sternum and hold its head up.
- Measuring the tube. Before you start, make sure to mark on the tube the distance between the calf's nose and the elbow, or back of the front leg. This is the approximate length that the tube should be inserted in this calf.
- Inserting the tube. Lubrication of the probe can facilitate the process of tubing the calf, and it is highly recommended. Lubrication can be done using some of the fluid you are about to administer. Make sure that the tube and any flexible tube connected to it is empty before and during this step. This will prevent liquid spilling and aspiration during the inserting process. With the calf's head slightly up, wrap your hands around the calf's mouth and gently squeeze to open its mouth. Then, slowly and gently, insert the tube over the tongue in the direction of the back of the mouth, aiming for the left side of the throat, stimulating the calf to swallow. Once the tube passes past the throat, gently slide the tube down the esophagus until the pre-determined mark. The tube should pass smoothly, so if you feel any resistance, stop immediately and check the tube's position. When passing the tube connected to the bottle/bag, it is crucial to ensure that the flow control valve is closed or that the flexible tube/bag is bent to prevent the liquid from flowing into the calf's throat during the process.
- Checking the tube and administering fluids. After inserting the tube to the previously discussed mark, you should ensure the tube is inserted into the esophagus, not the trachea or windpipe. To do this, palpate the calf's neck (on the left side). You should be able to feel the tube inside a softer structure. If you feel the tube inside a firm structure with rings, you have inserted it into the trachea instead of the esophagus. Gently remove the tube and try again. If the tube is in the right place, you can start the fluid therapy or colostrum feeding. Always administer warm fluids at a body temperature of 98-100 degrees Fahrenheit and make sure that the calf's head and neck are up above stomach level to prevent aspiration of liquids. An extra tip is to feed slowly and monitor its behavior throughout the process. If the tube is placed correctly, the calf will remain calm, sometimes exhibiting mastication movements. Lower the bottle/bag if you suspect something is wrong or want to slow down the fluid flow.
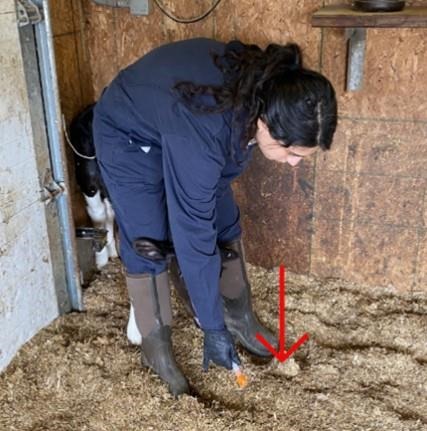
- Removing the tube. After all the fluid has passed down, stop the flow of liquid before pulling it out. Make sure that the tube and any flexible tube connected to it is empty before removing the tube. Then lower the head of the calf and remove the tube towards the ground to avoid fluid aspiration.
- Clean the tube. Rinse the tube feeder and wash it with soap and hot water. Use a disinfectant to rinse it again and hang it in the tube to let it completely dry before storing it until the next use.
- A printable summary of the steps to properly tubing calves in Spanish and English is also available to download.
Source : msu.edu